Petit Pool Project
Life update: We’re putting in a pool!
We’ve done a ton of work to our house over the last few years since we bought it as most of you know if you follow along on our social channels. It’s been fun and we have most of the main spaces done and I love them. We still have a lot to do, but we’re not going anywhere anytime soon. We moved every two years before this house, so that’s new. So as we embark on this chapter of our lives with our four kids we had a decision to make. We could invest in finishing the remaining primary bath, guest bath and laundry room or put in a pool and you guessed it pool won. Our kids ages range from 7-15 right now which means first off everyone can swim- which is obviously key and we’ve got one that feels like his foot is creeping closer to the door everyday. So rather than updating fully functional spaces that no one ever sees we decided we’d invest in our quality time with our kids for the next several years and put in the pool.
I don’t know about you but I think this is going to the thing. Meaning when they were really little the thing was a sandbox. That was the thing that kept them entertained outside and playing for hours, happily. Then it was the trampoline, still is a lot of times. But now that they're getting older I think this will be teh ticket to less screen time, more family time and hopefully more memories together here at home.
Now lets talk DESIGN:
I’ve gone round and round on two concepts.
Concept 1 The Garden Pool:
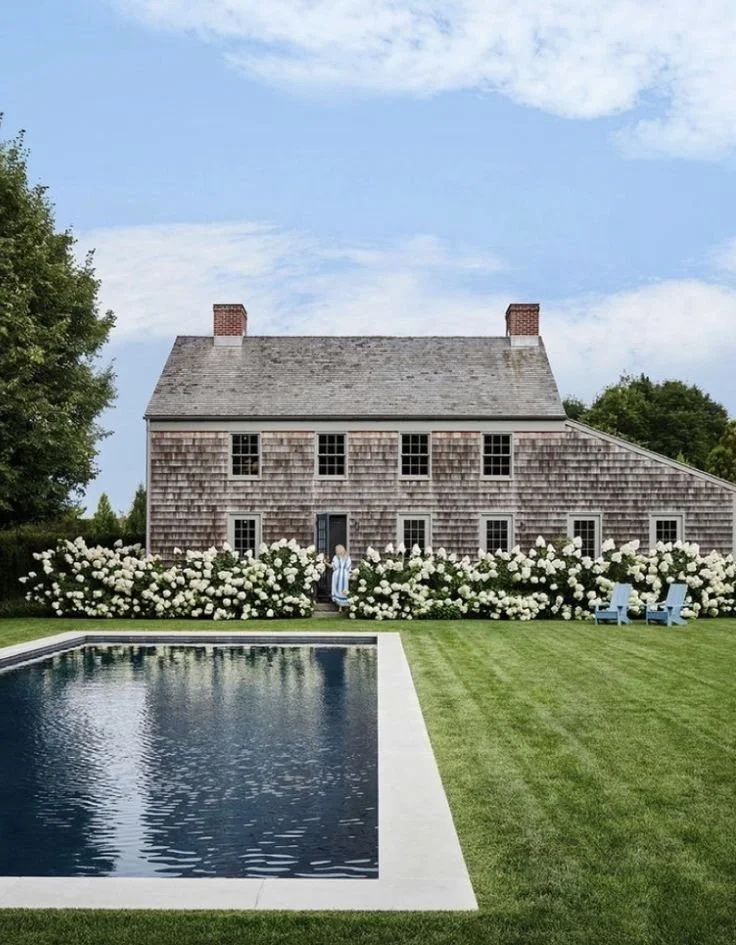
The dream obviously. Maine is my favorite place and this is quintessential east coast charm. Give the hydrangeas, the shingles, the double chimney colonial, and of course a floating garden pool surrounding by grass.
THE GARDEN POOL is essentially just floating in a field of grass. It’s gorgeous and soft and probably highly impractical but we’ll get to that later. For now just relish in this moment with me friends.
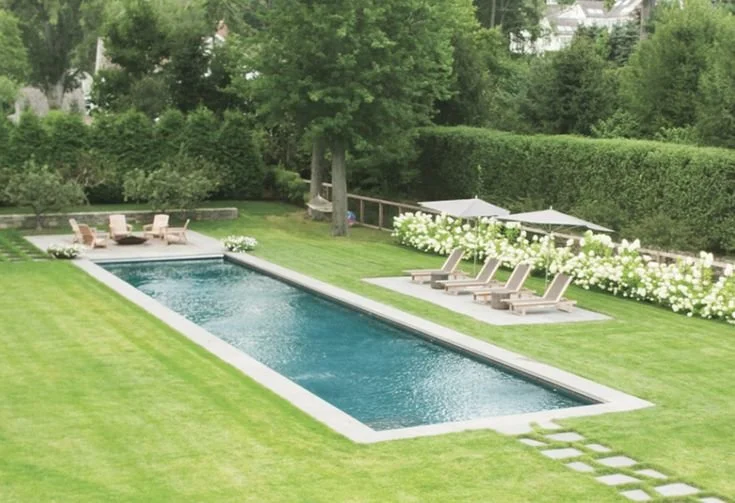
Gorgeous. Floating, paver paths.
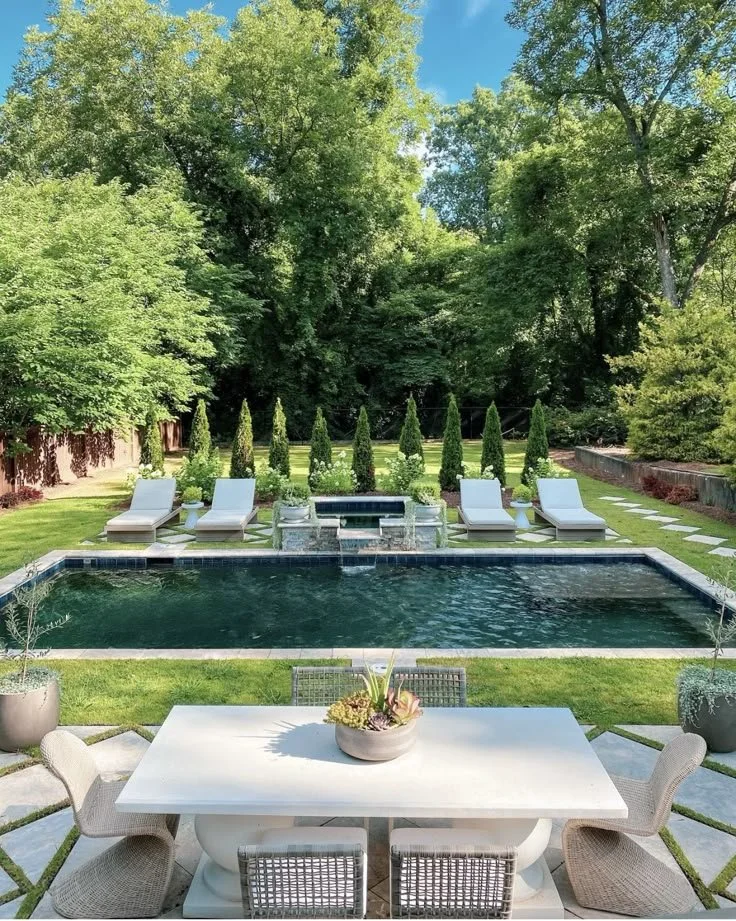
This water color is perfect. Lagoon-esque is the goal.
Concept 2 The Connected Pool:
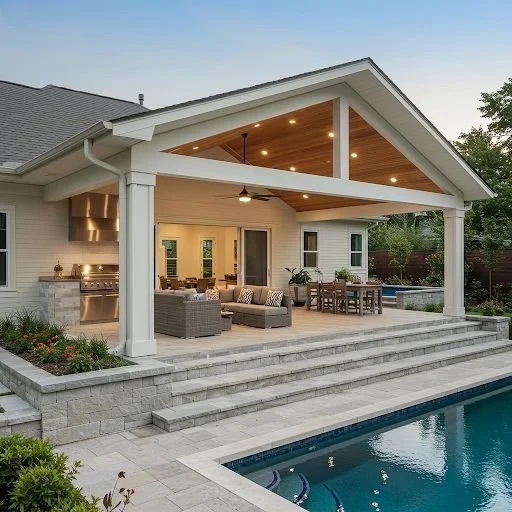
Basically the pool deck is connected to the house and the current patio. No grass until the opposite side of the pool.
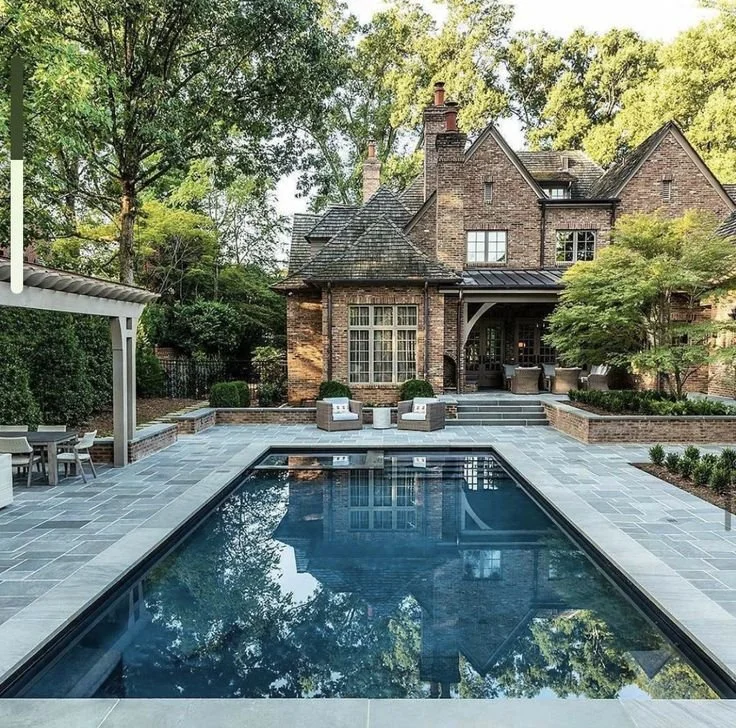
Neither of these are the correct orientation or style but you get the idea.
So. We’ve gone round and around and discussed turf vs grass and orientation within our yard. We want to keep as much grassy area as possible, we still have four kids and a dog. Soccer goals and badminton nets are still in our future for a while. And although I ADORE the look of a garden pool I think I’ve ultimately decided it’s just too impractical with the grass and four kids. From my research on turf, while it could look great it gets incredibly hot and so it doesn’t make sense for my kids to really play on it. Then there’s actual grass, while its beautiful and cool, we all know all of my kids are going to jump in 100x a day with grass all over their feet and its going to turn into a grass infested pool constantly not to mention the areas near the pool turning to mud. Basically it’s beautiful and great for adults, but not for kids. so that will have to wait for another chapter of life.
Design Education: CABINETS
Today we’re breaking down types of cabinets by how they’re made, as well as budget and my personal preferences. So lets get started!
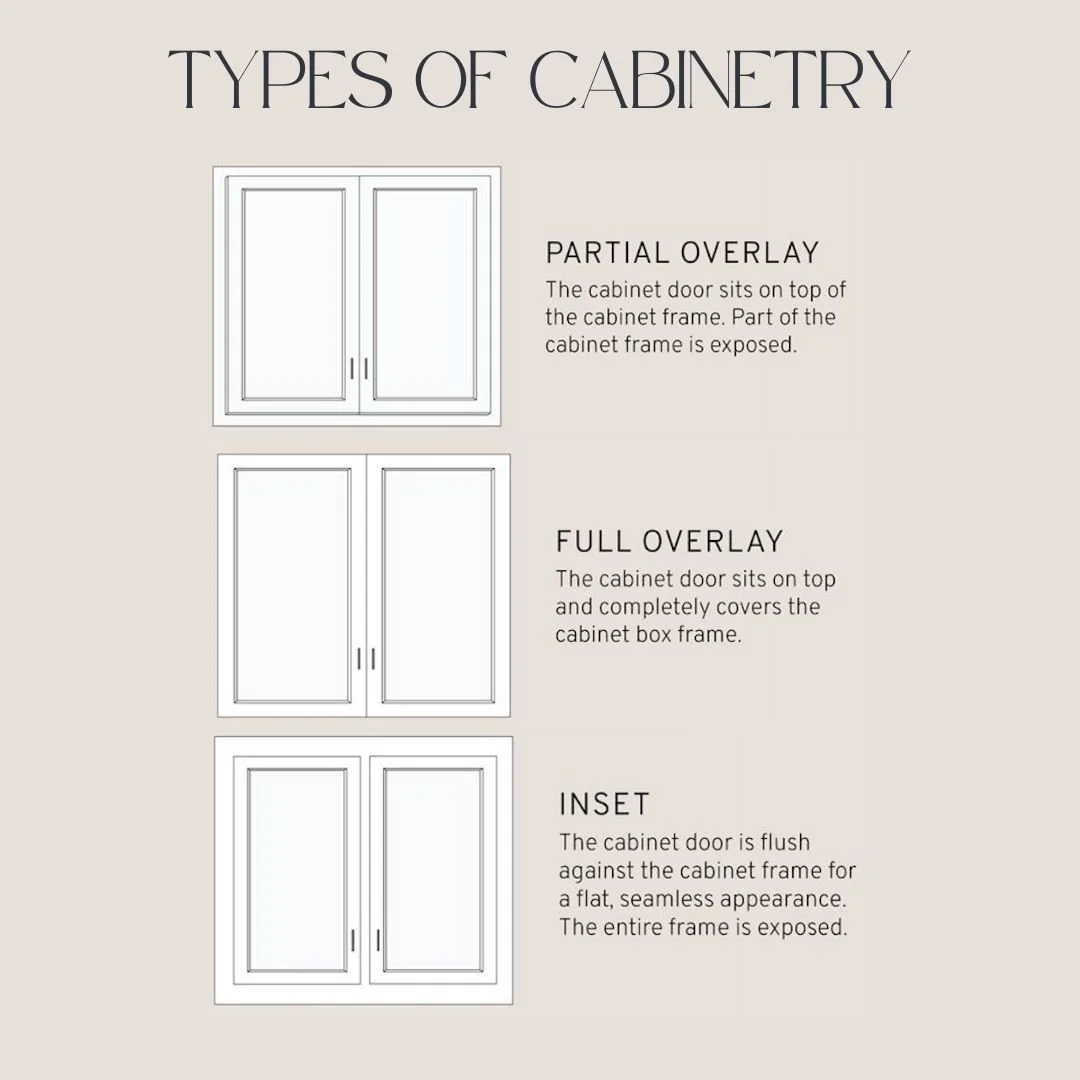
There are three main types of cabinetry based on how they're made. Let’s break them down.

Partial Overlay is when part of the cabinet door sits on top the cabinet face frame. Some portion of the frame is visible in any time of partial overlay. We also refer to this as a standard overlay, but there are different types which are differentiated by how much is showing of the frame.
This is the standard cabinet you see around. It’s cheapest to make and usually what is done by homebuilders, etc. It’s the cheapest because there’s more room for error than the other two types.

The next type is a full overlay. With this type it sits on top of the cabinet frame completely, so there is no reveal. This is middle of the road I’d say. It’s not the standard, but not as expensive as the last option. To me it is the next best option to inset cabinets if that’s not in your budget.

Inset cabinets are when the cabinet door is flush against the cabinet face frame, it’s seamless and the entire frame is exposed. This is by far my favorite option, however it is also the most expensive. It leaves no room for error whatsoever, making it more tedious to produce. It’s typically done in higher-end projects. It’s almost my favorite because it’s typical of what you see in old homes and antiques. I think it has more character and looks richer than overlay cabinets of any kind.
Other things that are going to affect the price of your cabinets are whether they are stain-grade or paint grade. Paint grade is typically MDF and not solid wood, making it cheaper, but also the standard. You probably don’t even realize most of the cabinet you see are mdf. In order to be able to stain cabinets or anything for that matter you need to use wood with particular grains and colors like walnut, oak, etc. The price will vary based on what type of wood you use to get your desired look but it will always be more than paint-grade wood.
The other major factors that go into the price of cabinets are the detail around the face frame if you do inset. There are various other details you can add such as beading etc. As well as the internal parts of the cabinet. Of course it will be more to have dividers inside your drawer built in, or intenal customizations like that. The other option that can up the price considerably are the types of hinges. Soft close hinges are pricey compared to standard hinges.
So that’s the breakdown on cabinets for now. It’s a good into in to cabinetry and maybe we’ll dig deeper another time!
The petit project: 30 days in
Well we’ve been at our kitchen renovation for about 30 days. I say kitchen, but if we’re being honest it’s also the breakfast and laundry room as well. And after that the dining and living because the flooring and doorways have been affected by the kitchen reno. So far it’s been mostly demo and all of the least fun part of renovating, the unseen but very important work. As a person that works and thrives in changing the look and feel of spaces, this is not that part. Hell, even demo is more fun. So here’s a rundown of what we’ve done so far, but prepare yourself because it’s a rollercoaster and remember the name of the game is PIVOT. You must remain patient and flexible when you renovate. Trust the process.
We completely disassembled the old kitchen and Jacob set up a temporary kitchen in our dining room, because ya know LIFE, people gotta eat. Also we don’t have a dining room table anyhow because we sold some of our furniture with our old house in August. Then we removed the wall between the “stair hall” and the galley kitchen. This over doubled the size of our kitchen and made use of a very unusable room, that was essentially a very oversized hall in the middle of our house aka “the stair hall.” The stove was on that wall as well so the gas line will need to be moved as well to it’s new placement. Thats on the current to do list. Then we went about taking down all the sheetrock so we could redo the electrical. Due to the age of our house and the multiple additions over the years the electrical is a mess. Some is original knob and tube and some has been rewired. So we made an electrical plan determining outlets, lighting, etc and then rewired and ran new lines etc to get the electrical corrected for all the affected areas and went ahead and ran the new lines for the rest of downstairs so were ready to go when we move into the other half of the downstairs, which is two bedrooms and two bathrooms.
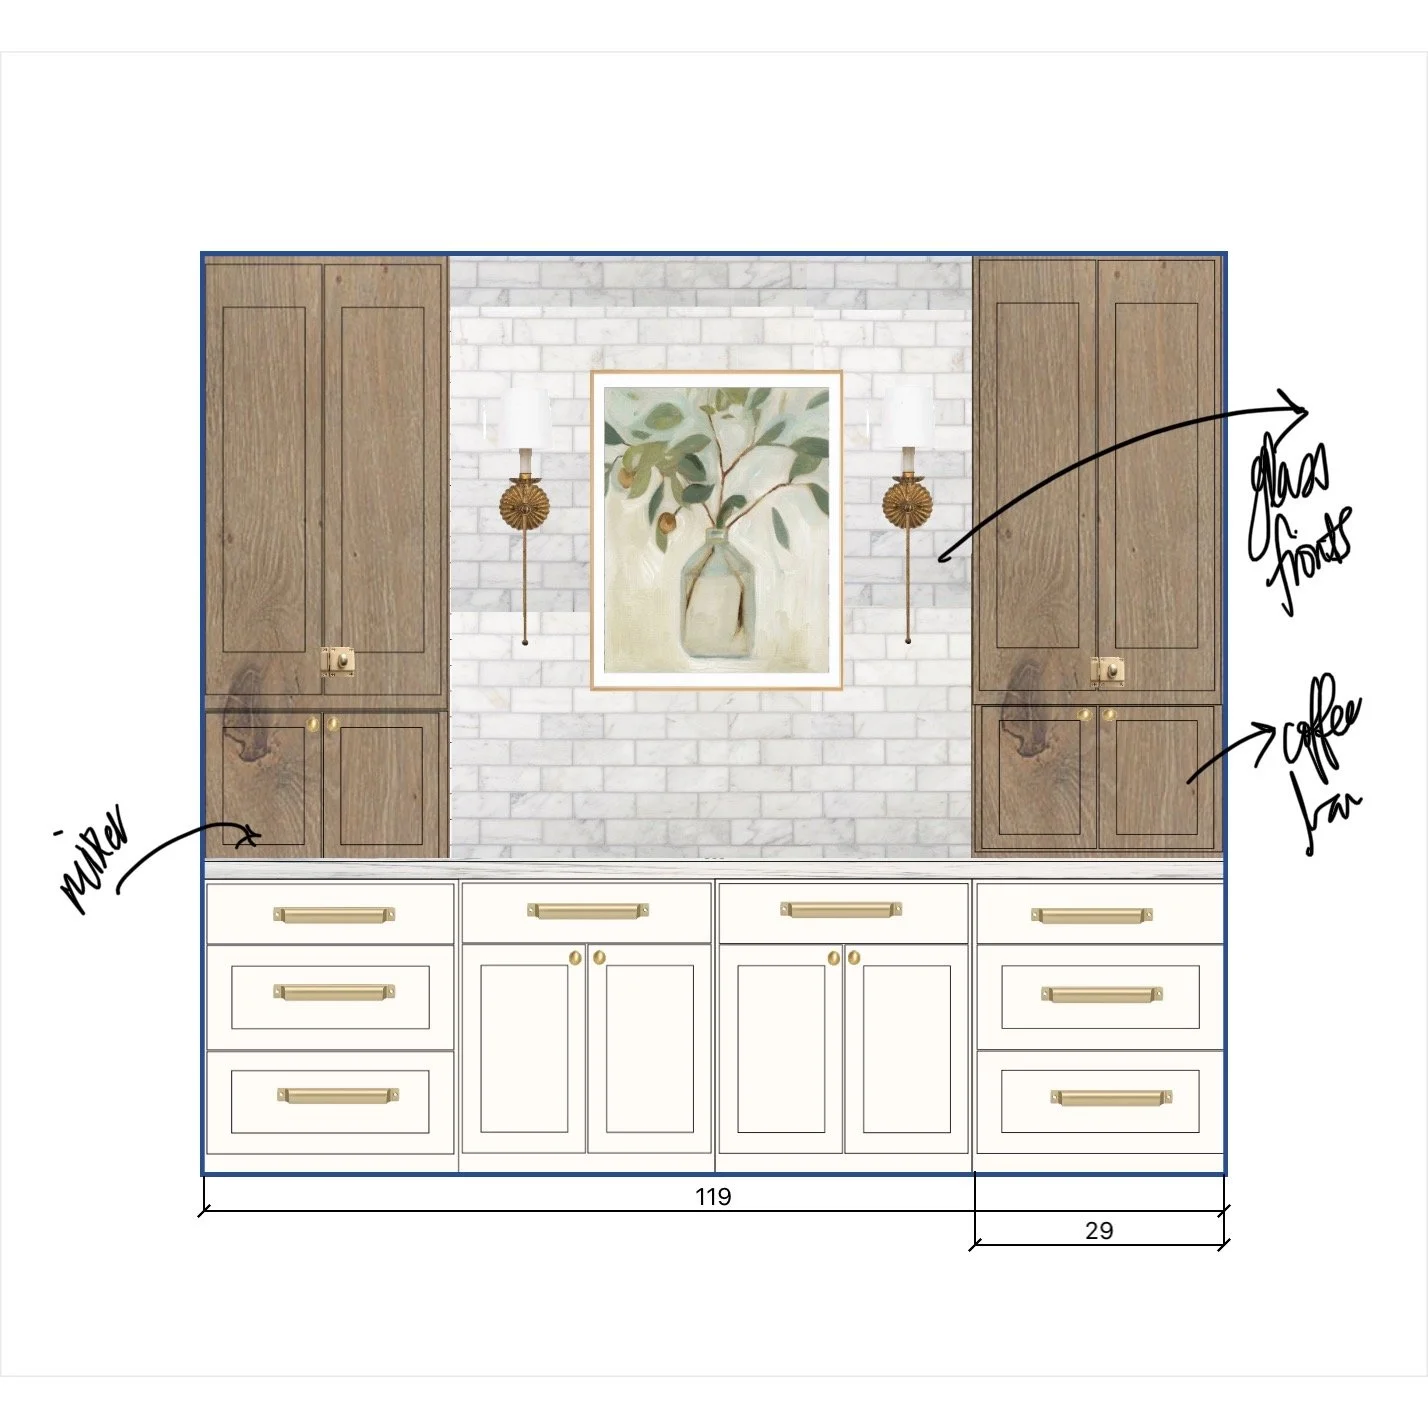
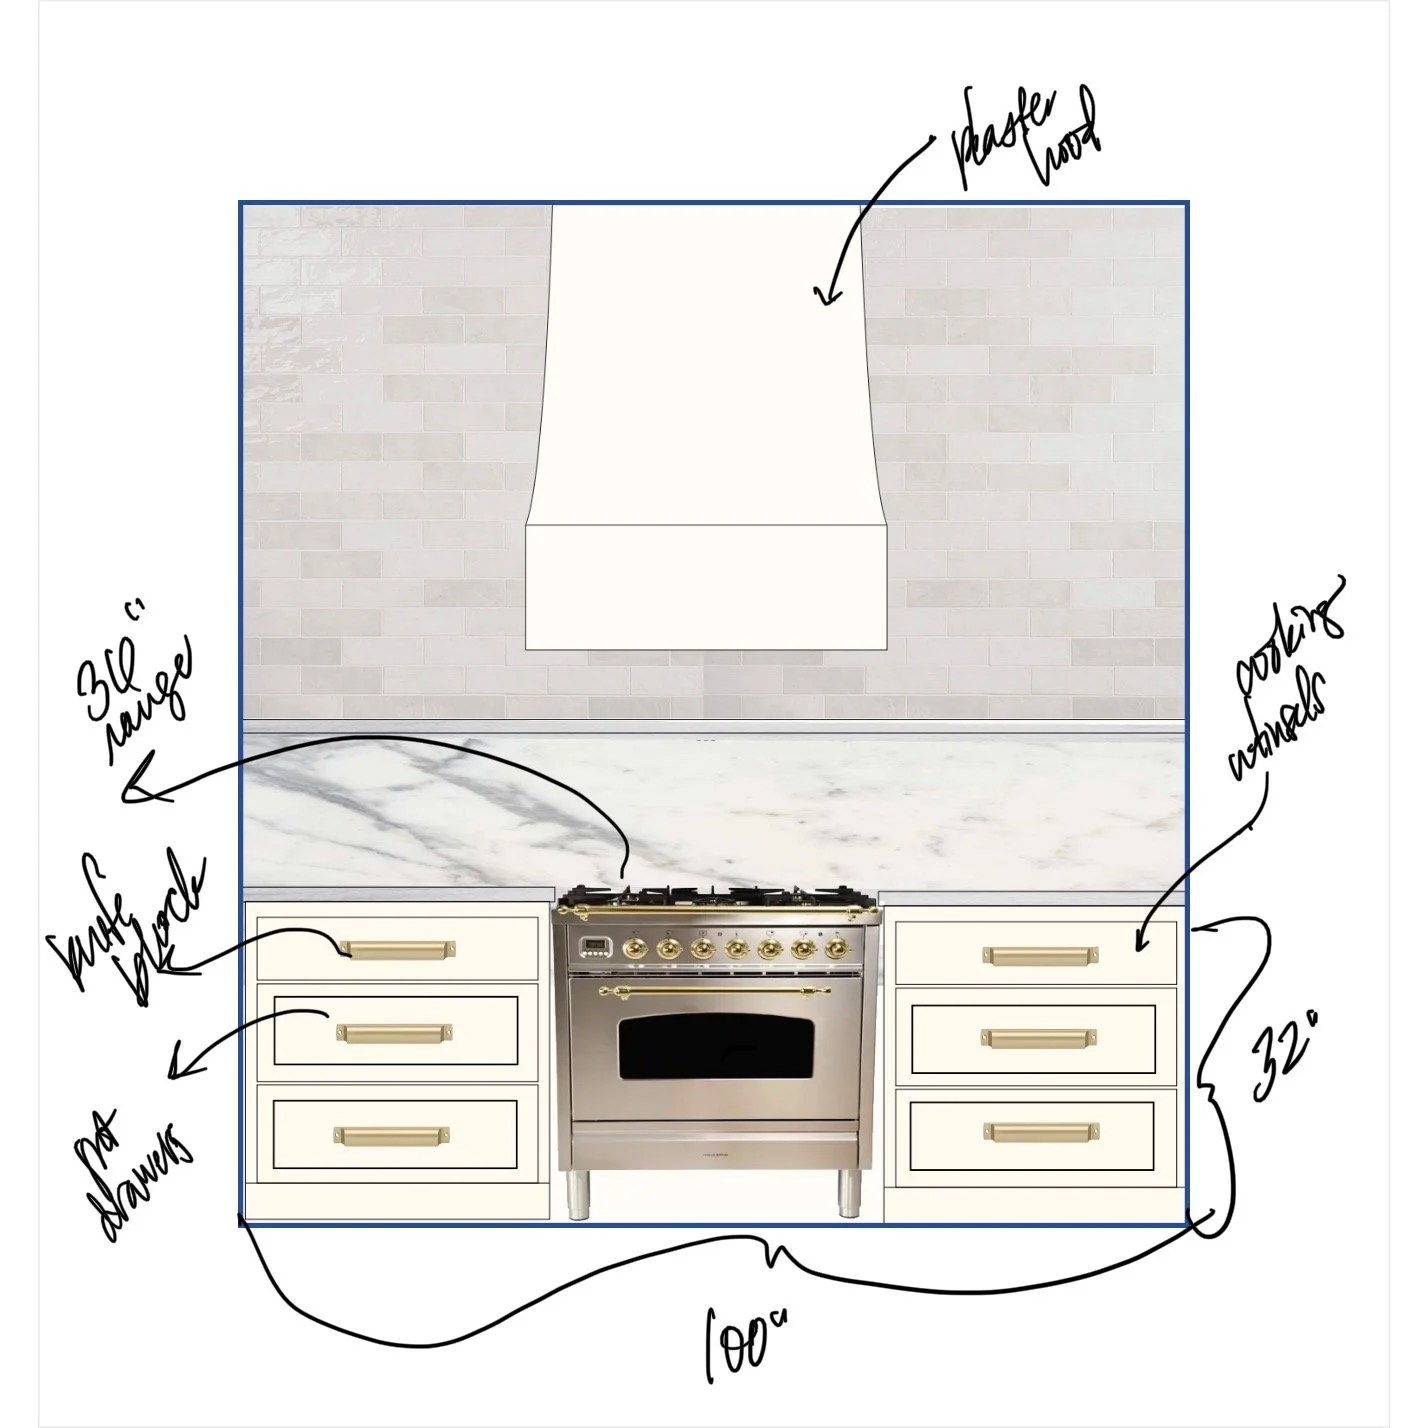
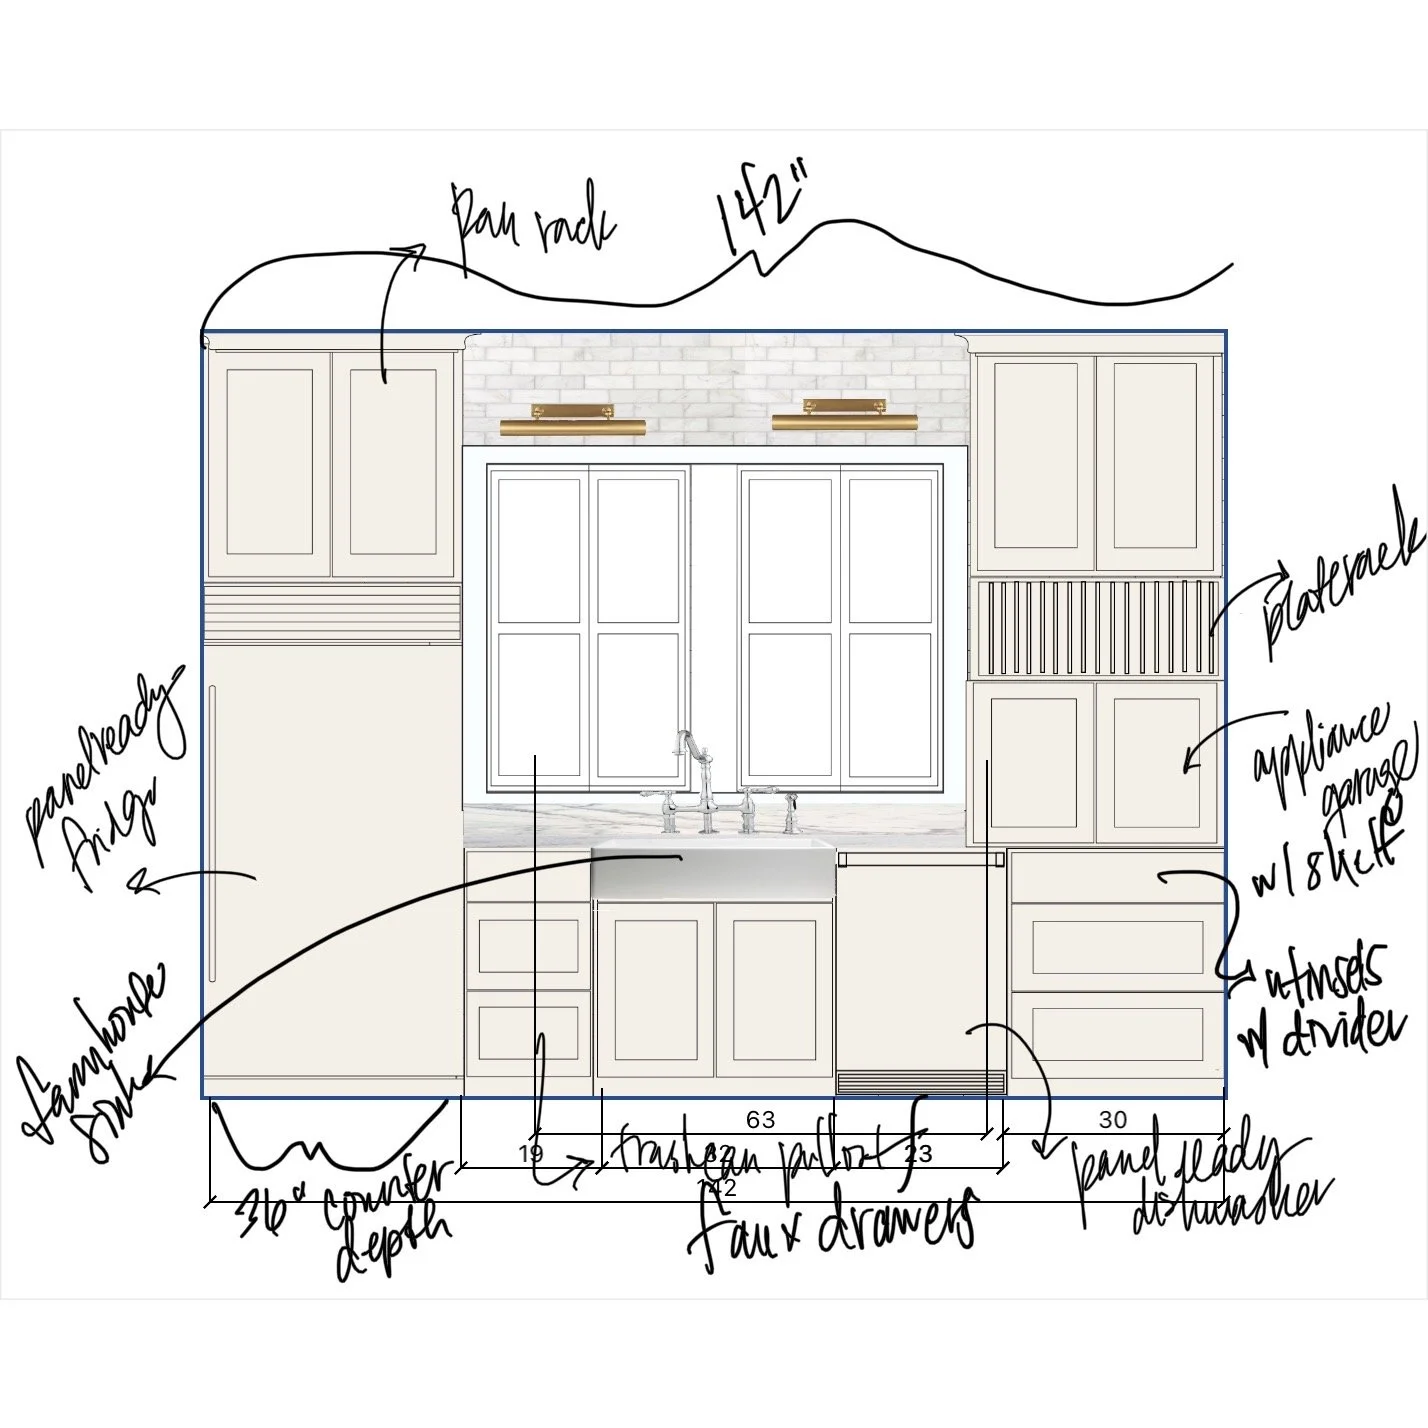
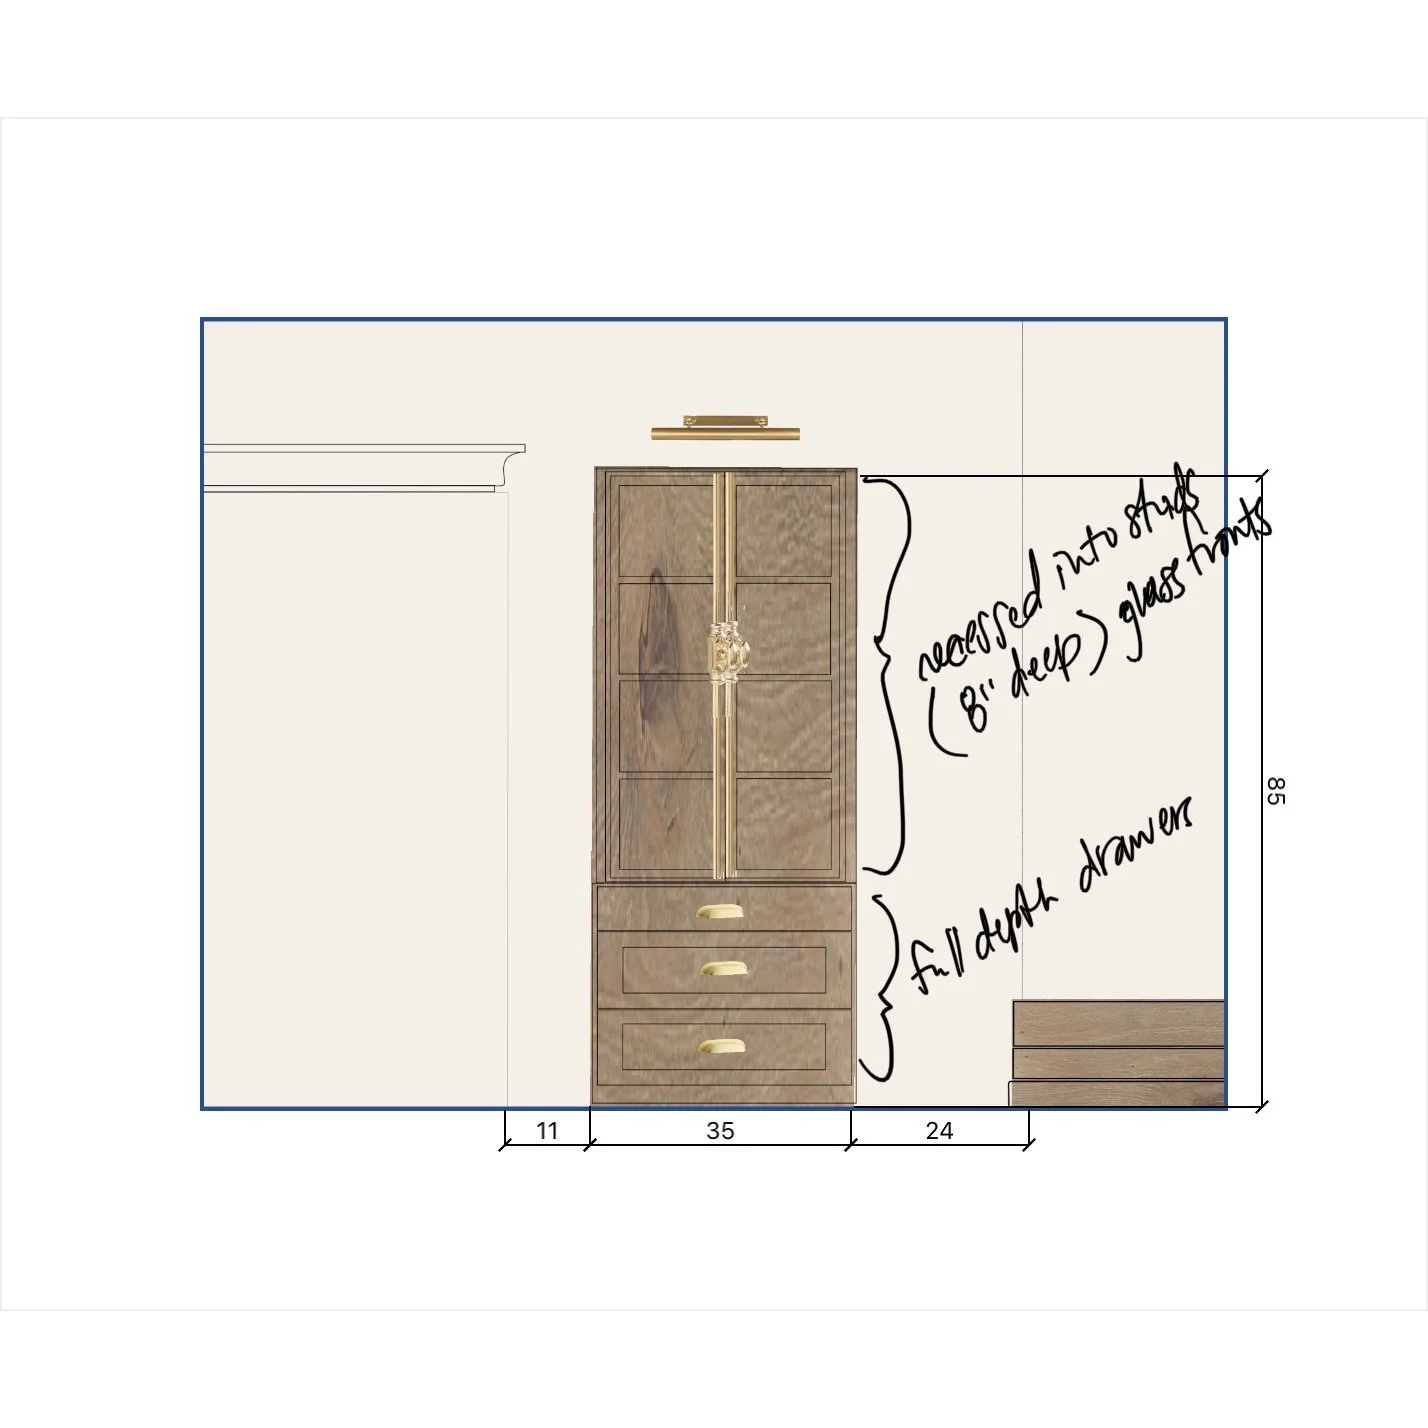
In the meantime I’ve been drawing cabinet elevations and layout and thinking through the use of the spaces down to where’s the tupper-ware gonna go? And during this process Jacob and I talk through every single thing. He’s very skilled at floorplan, layout, and really covers me in the areas where I’m weaker. So we discuss ALOT, and by discuss I mean occasionally have a loud discussion, because we’re married after all but you gotta keep the spark alive somehow right? But I digress. The current drawings are below. But let’s remember the name of the game is PIVOT, so it may change.
We also took out the floors in this area. So lets go back to the beginning for a minute. When we bought our house it had visually uneven floors in several rooms. We could tell there was some foundation work done and had it checked and it was structurally sound, but it didn’t fix the floor aesthetically from the inside. As soon as we bought the property we had foundation work done again in an attempt to raise the lower parts. It was essentially a waste of money, frankly because of who we used and that they were not competent and I would not recommend them at ALL. So we decided to level the floors off internally as it would be the only way to get the floors visually level, HOWEVER this requires us raising sections of our entire downstairs upto 1.5” because the perimeter of the house is higher than the center. Which also means that all of our doorways will also need to move up, thus creating a snowball effect. You still with me?
Let’s move to the next layer of the onion. We tore up the floors in order to get to the subfloor, as it turns out the subfloor is rotten and multiple floor joists have to be replaced. This is structural and obviously important. While under there it further reinforces that the issues with our foundation and the center sinking over time is the drainage. We knew this but it really sealed it for us that it had to be remedied immediately. So now we’re pricing drainage for the entire house. It’s the only way to remedy the problem and ensure all the work we put into the house isn’t wasted due to the structure continuing to move over time. It has to be dry under a pier and beam house, period.
So then we got to work reframing the openings to our new layout. We have several doorways/cased openings into the kitchen because it’s in the center of our house. The wall between the now kitchen and living room had a cased opening but it was in sort of the middle of the space and didn’t make for a good layout for the kitchen or living room. So we moved it to the end of the wall and made it a touch smaller. This will make more space for cabinets in the kitchen as well as more room for furniture in the living area without cutting off the spaces. You really have to think about layout and floorplan of furniture when you make these decisions. We’ve also taken our the area where there were french doors and are replacing it with a custom 3/4 glass and wood single door, this will still allow us to see the backyard but extend the stove wall about 3 feet.
So that’s where we are! The floor tile is in! The door is being made and hopefully we’ll decide on a pantry resolution soon and can frame it up and then start sheetrock and then flooring!
xo-Kristina
the petit project: our PERSONAL baton rouge renovation
Our Baton Rouge Renovation

We bought our house in August 2022 in an old area of Baton Rouge near the LSU lakes. We absolutely love the neighborhood, the neighbors are really close knit and wonderful and its walking distance to restaurants, bars and even ice cream for the kids which I adore. Being a true city girl at heart I’d prefer to walk everywhere and love the sense of community it creates. So if I can’t be in NYC or Chicago this is as close as I’m going to get in Baton Rouge.
It’s a great 2500 sq ft house with four bedrooms and 3 full baths and the perfect amount of space for us with a great yard. However, it’s outdated. So we bought it knowing almost every space would have to be touched and it would be a true labor of love. We decided to start with the kitchen because it has the most impact downstairs and the plans for it really changed the layout of the downstairs dramatically.
We originally had a very small galley kitchen with not nearly enough cabinetry or work space and on the other side of the stove wall was a large wasted space with our backdoor and staircase to upstairs. We never could quite figure out what to do with it. It was like an oversized hallway, but had multiple traffic paths coming through at the center of the house so it couldnt have much furniture. It was what was originally the dining room we believe, but now that the house has had two additions since it was built we already have a breakfast area and formal dining room so another eating space didnt make sense. We jokingly called it our back foyer, because it sounded fancy.
Sooo, we decided to take out the wall between the two spaces and expand the kitchen into it to more than double the size and create a far better flow. My original plan was to expand the galley into the breakfast area, but theres mechanical duct work for the upstairs that runs across and it couldn’t be moved so it would have always had that eye sore. Jacob suggested what were doing now and honestly at first I didn’t take to it. But now, as usual, I realize he was totally right. His background is in architecure and he’s great with scale and layout in particular.
So we got to work taking out the flooring and wall over the course of January as you can see in the video below.
I’ve had ideas for this house since the second I saw it. We both could immediately see the potential. So i’ve been saving images of ideas and spaces I love that fit the style of what I’m trying to create in this house since September. I approach it the same way I approach any project, as a whole house that needs to be a complimentary cohesive collection of spaces. That doesn’t mean they look the same but they make sense near each other and compliment one another. I pulled the images together and narrowed them down to make a mood board for myself of the aesthetic which is at the top of the page. I also pulled my color palette for the house from those images.
Essentially I want the house to look both current and classic. Which is the essence of my entire brand. My goal is always to create spaces that look modern and updated but also timeless. Our house is particularly important though because of its age. I want it to feel updated but also restored to it’s full potential, as though the items could have always been there.